Importing Configurations
Configurations play a crucial role in accurate estimations within the BuildPlateZ platform. This is why entering accurate data when creating configurations will provide a more accurate estimation.
However, not all print properties that a printer needs are required for BuildPlateZ to work. BuildPlateZ only needs the fields that directly influence the time needed for printing and the material weight.
Basics
Adding a new Configuration is done from the Configurations page under Machines -> Configurations in the main header menu by clicking on the "Create Configuration" button on the top right.
 Currently only Prusa Slicer configuration files (.ini) are supported. If you have a Prusa Slicer configuration file, you can upload it here. The platform will automatically extract the necessary properties from the file and fill out the form below.
Exporting a Configuration file from Prusa Slicer
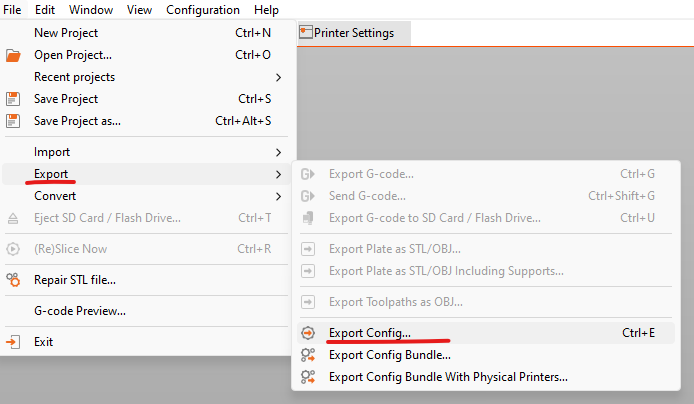
To export a configuration file from Prusa Slicer, follow these steps:
- Open the slicer
- select the configuration you wish to export as if you will use it for printing
- Go to
File -> Export Configand save the file to your computer

Creating your own .ini file
If you are using different slicing software and cannot import an .ini config properly, you can create your own .ini file instead of copying properties into Prusa Slicer and then exporting.
FFF Printers .ini template
SLA Printers .ini template
Importing a Configuration into BuildPlateZ
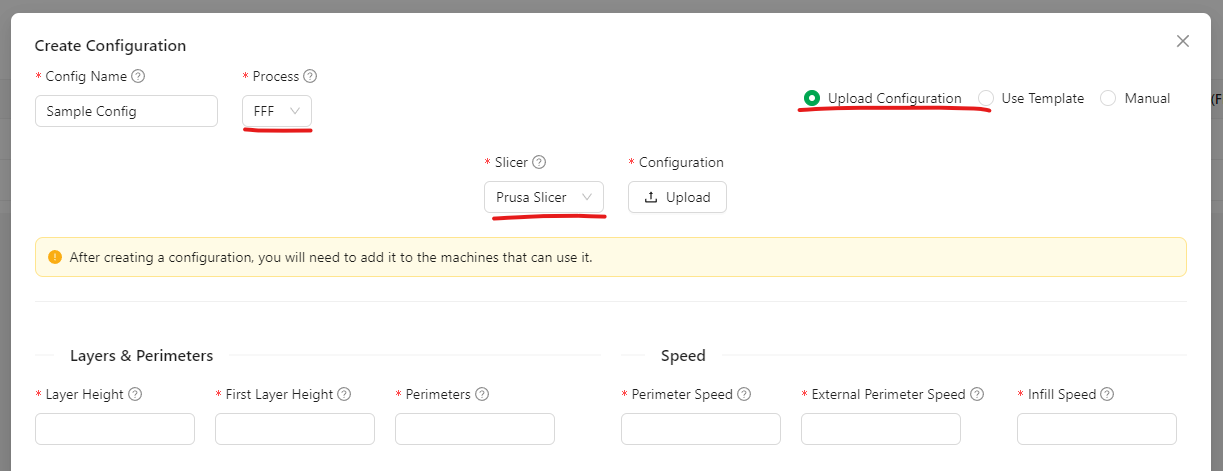
- Give your new Configuration a name and specify the print process this config is to be used for. (e.g. FFF)
- Once you select the Process, 3 options will appear:
- Upload Configuration: - Upload the configuration file you exported from Prusa Slicer
- Use Template: - More information here
- Manual: - More information here
- We are currently interested in uploading our Configuration file, so choose the first option - Upload Configuration
- For the slicer, select Prusa Slicer - currently only Prusa Slicer configuration files (.ini) are supported

- Upload the file and the platform will automatically extract the necessary properties from the file and fill out the form below.
- You can modify the imported properties if necessary and finally save the Configuration.
(The procedure for SLA printers is the same, just select SLA as the print process)
If for some reason a property is missing from the Configuration file you are importing, it will be automatically filled with the default value.
Adding a Configuration to a Machine
In order for a Machine to be able to use the new Configuration you are creating, it has to be added to said machine. This can be done from the Machines page under Machines -> Machines in the main header menu. Edit the machine you wish to add the Configuration to and select it from the Configurations dropdown.
Note that you can add a Configuration to a Machine only if their Print Processes match.
Read more about Machines and creating them.